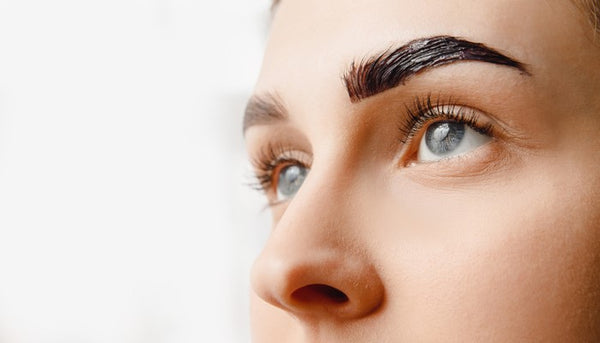
Your Guide To Creating Perfect Eyebrows On Your Own
When we first get into makeup and skincare and start to pay attention to how we look, we tend to forget about the eyebrows. Eyeshadow, mascara, lipsticks, and highlighters are a lot of fun to learn about and use, but it may take you a while to discover how they work to together a flawless day or night makeup look. That’s why it’s understandable to overlook the eyebrows.
However, eyebrows can completely change your appearance, if done right. They add more depth to your face, lift your features, and open your eyes more. They can make you look younger and more refreshed, no matter how late you stayed up last night (whether you were going out for a drink or just binge-watching Netflix shows, we won’t judge).
At the same time, eyebrows don’t have to be complicated at all. You don’t need to spend a lot of money to shape your eyebrows each month. In fact, you can create the perfect eyebrow all by yourself in the comfort of your home! All you need is a pair of slant tweezers, perhaps a pair of manicure scissors, and a critical eye.
In this comprehensive guide on doing your brows at home, we’re going to talk about brow shaping, filling them in, and perhaps coloring them if you wish to spice up your look.
Let’s start with an essential part.

Assessing Your Eyebrows
Before you begin any work on your eyebrows, you need to assess your current situation. It would be best if you could let your eyebrows grow out for at least six weeks before you start shaping them, just so that you can clearly see what you’re working with. If six weeks is too much for you, go without doing anything to your brows as long as you can.
Look at your brows in the mirror - possibly even a magnified mirror - and pay attention. Are they too thick or too thin? Are the brow hairs too long and unruly? Do you have any sparse spots? Do you perhaps dislike the color of your brows and would like to change it?
In this first assessment step, you also need to consider what you want to achieve. Do you want a well-defined brow? A dark, bold one? Or do you want a more natural look? Take your face shape, bone structure, and the proportions of your features into account when you’re deciding on the perfect brow for you.
An eyebrow that will work in any situation is one that closely resembles your natural shape. Your eyebrows should follow the line of your brow bone, and if you’re not against it, they should retain their natural thickness, at least in the first part up to the arch. A natural look always goes well with any type of makeup. (A moment of silence for the over-tweezed ‘90s eyebrows... That was a bummer for everyone.)
Before you get into shaping your brows, use a spoolie brush to brush them upwards and find the beginning of your brows. This will give you a better impression of your brow hair and how it works.

Shaping Your Eyebrows
Once you know what you want, it’s time to go for it!
- Start between the brows
Take a pair of tweezers and start from the space between your eyebrows. Everyone has at least a couple of stray hairs here: some more, some less. If you’re unfortunate enough to have a unibrow, it may take a bit more work than usual.
When you’re tweezing, it’s important to do it from the roots of the hair follicle. This helps prevent ingrown hairs and irritation later on. If you can, pluck the hairs in the direction of the hair growth to minimize the redness (and pain) and keep the tweezers angled close to your skin.
The general rule is that the space between your brows should be about as wide as your finger.
- Take breaks
If you spend too much time in front of the mirror with tweezers in hand, you may start to lose perspective. It happens to all of us. We see stray hairs here and there, then this line isn’t defined, and then one more hair here, and before you know it, you don’t have much brow left to work with.
So, while you’re plucking your eyebrows, it’s important to take breaks. Step away from the mirror for a bit and regroup. Have a cup of coffee, check your inbox, watch a funny YouTube video. Once you’re ready, you can continue with a fresh mindset and a more objective view of the situation.
- Clean up the underline of your brows
The first part of your brows, the one that goes upwards, is usually pretty well-defined. All you need to do here is remove some of the stray hairs, if you have them, and provide more definition.
It gets trickier in the second part of your brow where the underline isn’t as clear, but keep in mind what shape you’re going for here. If you want thick eyebrows, don’t take too much away. If you want a cleaner look, try to go for a straight line. Don’t stress too much over it! You can always provide more definition by filling in your brows.
- Don’t take too much from the top
Removing hair from the topline is okay, especially if you’re dealing with more unruly eyebrows. However, don’t take too much away here because it might mess with the overall shape of the brow and make your job more difficult later on. Pluck top hairs only if you feel like you absolutely need to.
- Hold the skin taut
Throughout this whole process, if you find it challenging to zero in on one eyebrow hair, you can use your non-tweezer hand to hold your skin taut. Don’t pull and stretch it, though! Just keep it in place so you can be more precise. If you stretch the skin, you might not get the results you wanted when you release it back in place.
- Careful with eyebrow scissors
You may want to brush your eyebrows up and trim any hairs that stick out by using a pair of manicuring scissors. This is a good technique! But try not to trim every hair. Stick with one or two that are the most prominent. Otherwise, you will get a funny shape that will take a long time to go back to normal.

Filling In Your Brows
Even if you’re satisfied with your eyebrow shaping, you may still notice some inconsistencies in your brows after your handiwork. Perhaps one eyebrow is not the same length as the other, or some sparse spots bother you. Maybe you want fuller brows than you have, or your makeup look requires a bolder shape.
Either way, the next step would be to fill in your eyebrows. Don’t worry. You don’t have to be a brow expert for this! All you will need are the right tools for the job.
In this case, the right tools are eyebrow fillers of your choice (eyebrow pencils, pomade, or brow powder) and the right brush (an angled and/or a spoolie brush is recommended).
If you’re more experienced with filling in your eyebrows, you can go in with a brow pencil. Outline your brows with a light - very light - touch and fill them in with gentle strokes. These strokes should resemble real brow hair and should be light and feather-like.
However, it’s relatively easy to overdo it with a brow pencil if you’re not careful. It can also be a bit tricky to keep your focus and flawlessly fill in all the gaps.
If you’re not in the mood for using a pencil, or you’re a beginner in the art of filling in brows, you could go for a powder or even brown eyeshadow and an angled brush. This will create a softer look, and you will avoid accidentally making harsh lines.
The key to filling in your eyebrows is moderation. Go slow, be patient, and take breaks, just like you did with eyebrow shaping. Make your strokes light and airy and try to avoid overfilling.
Of course, if you don’t like what you see, you can always remove the brow makeup and start again!

Coloring Eyebrows At Home
As a final option for grooming your brows, you can look into coloring them. If you’re dissatisfied with your eyebrow color for any reason - or wish to change it to enhance your look - you can easily tint your brows all by yourself. Eyebrow tinting only takes a few minutes!
- Preparation
For successful brow dyeing, you will need the right type of dye (not permanent hair dye!), petroleum jelly, cotton swabs, an applicator of some kind (the one you get with the dye kit is fine), cotton pads, a steady hand, and a lot of patience. Keep a bar of chocolate close by to steady your nerves during the waiting period.
The best option for brow coloring is beard dye, though you can also look into semi-permanent hair dye and eyebrow dye. After you’ve done a patch test with the color to make sure you don’t have an adverse reaction, prepare your eye area by layering on petroleum jelly around your brows. Use cotton swabs to get the jelly on your skin around the eyebrow but not directly on the brow hair. This will protect your skin from irritation and prevent the dye from staining your skin.
- Dyeing
The trick with eyebrow dyeing is that you need to be more precise in your application than with filling in eyebrows because a lot more is at stake. You need to get the dye directly on your eyebrows and not anywhere else, and it would be best if you could get as close to the hair roots as possible.
Timing is also important here. The general rule of thumb is to wait anywhere between 3 and 5 minutes to get the color you want. If you want a more intense effect, wait longer. If you want only a shade lighter or darker than your original color, don’t wait too long. If your dye instructions say to wait 10 to 15 minutes, ignore them. By applying dye in shorter time intervals, you will have a better sense of the color and how drastic you want the change to be.
Use a stopwatch to measure the time and make sure that both of your eyebrows have dye on them for the same period of time. If one eyebrow has color on it for 4 minutes and the other for 5, you might get very different results.
Once you’re ready to take the dye off, wipe it off with cotton pads. You may even wash it off if you’re worried about hairs that might fall out if you rub the spot. Don’t rush through this part because you need to get all of the dye off. If a little bit of color remains, it will not only continue to color your brows, but it could also cause skin irritation. Have patience and pay attention to detail!
Don’t Despair!
The crucial thing in any DIY brow adventure is not to lose your cool. As we said at the beginning of this post, brows don’t have to be complicated. Anything you do to them - save for over-plucking - isn’t forever. If you mess up trimming your eyebrows, wait a few weeks until your brows grow out again. If you don’t like the color, wait two weeks for it to fade, then try again.
The eyebrow game is just as experimental as the makeup game. You need to find what you like and what works for you. Some people are uncomfortable with dyeing their brows, so they choose to fill them in every day. Some are too lazy to fill them in, so they dye them or even go for microblading.
Hey Babe, don’t forget that there is no right or wrong here. After all… you’re the babe! Whatever makes you feel like your best, most gorgeous self is what you should go for!


